Sunday, December 29, 2013

Setting and Unsetting a Static IP on Ubuntu or Linux Mint with Virtualbox (Use Router DHCP Instead)

Hi, Had to setup (or more accurately unsetup) a static IP on Ubuntu / Linux Mint recently. It's fairly simple to do (and covered in other places on the web).

What's not covered is in Saucy Salamander (or perhaps earlier) is how to remove a static IP once set. I had to do this because I was moving a virtual machine from one computer to another. The old computer had an internal network and was getting its IP from a firewall virtual machine, 10.0.0.1 . I wanted to convert it to use the router's DHCP to simplify things.

So, modify the /etc/network/interfaces file but be prepared to do the following if you are changing network cards / static IPs:

1. Backup then delete the file /etc/udev/rules.d/70-persistent-net.rules . If the MAC address of the network card changed, then you want to delete/edit/remove this.

2. Remove the nameservers from /etc/resolvconf/resolv.conf.d/ in the base head tail files. This is different than the usual /etc/resolvconf/resolvconf.d which is no longer in use in Saucy (and perhaps earlier).

3. Use the router screen to assign the IP to eth0 instead of configuring it in /etc/network/interfaces file. This saves a lot of headaches in the future. Get the MAC address of the output and assign all devices connecting with that MAC address in the router/firewall a static IP.

eth0      Link encap:Ethernet  HWaddr 08:00:27:95:f5:4a
          inet addr:192.168.1.13  Bcast:192.168.1.255  Mask:255.255.255.0
          inet6 addr: fe80::a00:27ff:fe95:f54a/64 Scope:Link
          UP BROADCAST RUNNING MULTICAST  MTU:1500  Metric:1
          RX packets:169271 errors:0 dropped:0 overruns:0 frame:0
          TX packets:137399 errors:0 dropped:0 overruns:0 carrier:0
          collisions:0 txqueuelen:1000 
          RX bytes:167822172 (167.8 MB)  TX bytes:15632156 (15.6 MB)

lo        Link encap:Local Loopback  
          inet addr:127.0.0.1  Mask:255.0.0.0
          inet6 addr: ::1/128 Scope:Host
          UP LOOPBACK RUNNING  MTU:65536  Metric:1
          RX packets:8803 errors:0 dropped:0 overruns:0 frame:0
          TX packets:8803 errors:0 dropped:0 overruns:0 carrier:0
          collisions:0 txqueuelen:0 
          RX bytes:691215 (691.2 KB)  TX bytes:691215 (691.2 KB)


4. If using Virtualbox, choose bridged instead of NAT if you want your router instead of Virtualbox to assign the IP. Of course I know what bridged and NAT is, but I had a brain fart and didn't realize the 10.0.2.15 address was a default address assigned by Virtualbox because I chose NAT instead of bridged. So I wasted two hours inside Ubuntu when I should have fixed Virtualbox instead.

5. Forward necessary ports from your router to your new virtual machine / install, and restart a few times and run ifconfig to see if you are getting the proper IP address.

6. You may have to use ifconfig eth0 up if you don't see the network interface up. Similarly, if ping google.ca doesn't work you may need to resolvconf -d eth0 to remove the incorrect DNS servers. All the DNS servers should be set in your router (physical router). If you want to use Google DNS, better to set it up in your router than on the operating system. resolvconf causes major headaches, because editing the text file manually doesn't work.

Hope the above was helpful. Next time I will write about how to setup a small virtual network with Virtualbox so you can create your own lab of virtual machines.

Tuesday, December 24, 2013

Linux Mint Petra New RAID writeable

Hi,

Spent a little bit of time messing around creating a software RAID with mdadm. It's quite simple once you have the three drives installed for RAID 5.


sudo mdadm -Cv /dev/md0 -l5 -n3 /dev/sda /dev/sdb /dev/sdc

In my case I wasn't installing the OS to a raid but just mounting storage raids so it was much simpler. I'll have to be careful to backup the home directory. After this is done and you reboot you should see the RAID device in Ubuntu's disk management under Menu -> Preferences -> Disks Next is the trick (and the point of the post). The fstab line.

sudo vim /etc/fstab


The fstab code (add at end):

# RAID ARRAY
UUID=XXXX /mnt/folder ext4 defaults 0 0


I thought I would have to use some complicated options, but defaults works well. Replace XXXX with the UUID from disk management. When you reboot and login, you will see the RAID mounted on /mnt/folder. You will not be able to access it. Never fear, simply take control of the folder. (note this will modify all the files in the mounted drive -- I had an empty drive so this didn't matter to me, but if your drive is not empty you may not wish to do this). (if you drive is not empty, you will have to fool around with the fstab line above. See the manpage for fstab to change defaults to the appropriate values).

sudo chown user:users -R /mnt/folder

That's it. Enjoy your new RAID. Remember, RAID is not backup. Use rsync -av and an external drive (ideally stored in a separate location) for that.

Monday, December 23, 2013

Linux Mint Petra 16 Triple Monitor / Dual Monitor Configuration with ATI Radeon 6950


Hi,

Spent a couple hours configuring a fresh Linux Mint installation for triple monitors. I have a DVI, HDMI and mini-Display Port (active) connectors for my ATI card.

It was actually rather simple. After wading through many forum posts and doing some experimentation I found the answer (alas I did many reboots and reinstalls, so the forum post is lost). There is one simple trick at the end that makes this work but I thought I would post the whole process.

First, install the proprietary fglrx-updates video driver. This is through Menu -> Administration -> Driver Manager.


Next, reboot the computer. After you reboot the computer, you can check if fglrx-updates is being used by running this in the terminal :

sudo lspci -v | grep VGA -A 10

You should get output similar to the below (Kernel driver in use: fglrx_pci)


Next run the ATI control panel. Do this through the terminal. Make sure to cd into the correct directory first so amdcccle creates/modifies the correct xorg.conf

cd /etc/X11/
sudo amdcccle


Do not click the shortcut. It doesn't run properly with SUDO permissions.

Now that you have the ATI control panel (it should say superuser mode on the toolbar) go to the Display Manager.

In the Display Manager, select the multi-display desktop with each of the three monitors. Then, rearrange the displays so they are in the correct order by dragging and dropping the monitor boxes.

Hit apply. You should see the 3 monitors as different displays.

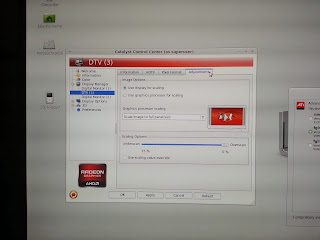
The next part was unique to me. The center monitor had a much smaller picture. This is due to overscan/underscan settings. This can be set under the appropriate menu on the left hand side under adjustments.

 Now, the next part that makes no sense at all (but apparently works). Exit the ATI control panel. Go to Menu -> Preferences -> Monitor. In order for the ATI settings to save betweeen reboots, you must open the Monitor menu, click the appropriate settings, uncheck the "same image on all monitors" box and hit apply (after of course rearranging the monitors). Basically you must duplicate the work you did in the ATI control panel in this dialog box.

Now, restart the computer.

If all went well, the settings will have saved and you will have three monitors with separate images using the ATI driver. Congratulations.

One final step. The menu bar may or may not be on the wrong monitor. Right-click the menu bar and go to properties, then uncheck "Expand".
Once you uncheck expand, you can then move the menu bar to the correct monitor by dragging it by its edge. Re-expand after the menu bar is on the correct monitor.

That's it. Good luck.

Sunday, December 15, 2013

Installing Linux Mint on a Asus UX32VD Laptop (or any laptop) PART 1 - Burning the ISO to USB

Note : Before you proceed, you should use Clonezilla to completely backup the hard drive of the UX32VD. The reason being, once you install Linux, it will clear the recovery partitions and other goodies you need to reinstall Windows 8 should you ever have the need to. I will detail how to use Clonezilla in a later post, including how to use Clonezilla to make a perfect backup of a hard drive. If you don't do this you will never be able to go back to Windows 8 (or whatever OS/recovery partition your vendor has).

Hi,

In case you didn't read the italics, you shouldn't do the following until after you've backed up all data on your laptop. This process will destroy all data and partitions on your laptop.

I have an Asus UX32VD laptop ultrabook. Today I decided to wipe Windows off it (I have Windows on my desktop and for various reasons require Linux on my laptop).

First, get Linux Live USB Creator. It's a great little program for creating Linux boot disks. It can even get the ISO for you, boot from Windows and a half dozen other neat things.


Above are the options I chose to download and burn Linux Mint. Note that I downloaded the Linux Mint DVD first, and used Linux Live USB Creator to read the ISO rather than use the Linux Live USB Creator's download ISO option within the software. But it shouldn't make a difference.

Next you will want to enter the UX32VD BIOS. Press ESC when you startup your computer and you will enter the BIOS screen. You need to do the following :

1. Disable Secure Boot

2. Enable Legacy USB support

Save, then reboot. When you press ESC again, you will see a choice to boot from your newly created Linux ISO. Boot from the CD.

I will write about the install process itself next, along with how to setup partitions and use the free 25 GB SSD included in the UX32VD for blazing speed.